How to Build a Console Table from Scratch: A DIY Farmhouse Console
How to make a console table DIY from 4x4 legs, 2x4 aprons and a thick 2x8 top: tools, cuts, assembly, finishing and the anti-tip step, explained in order.
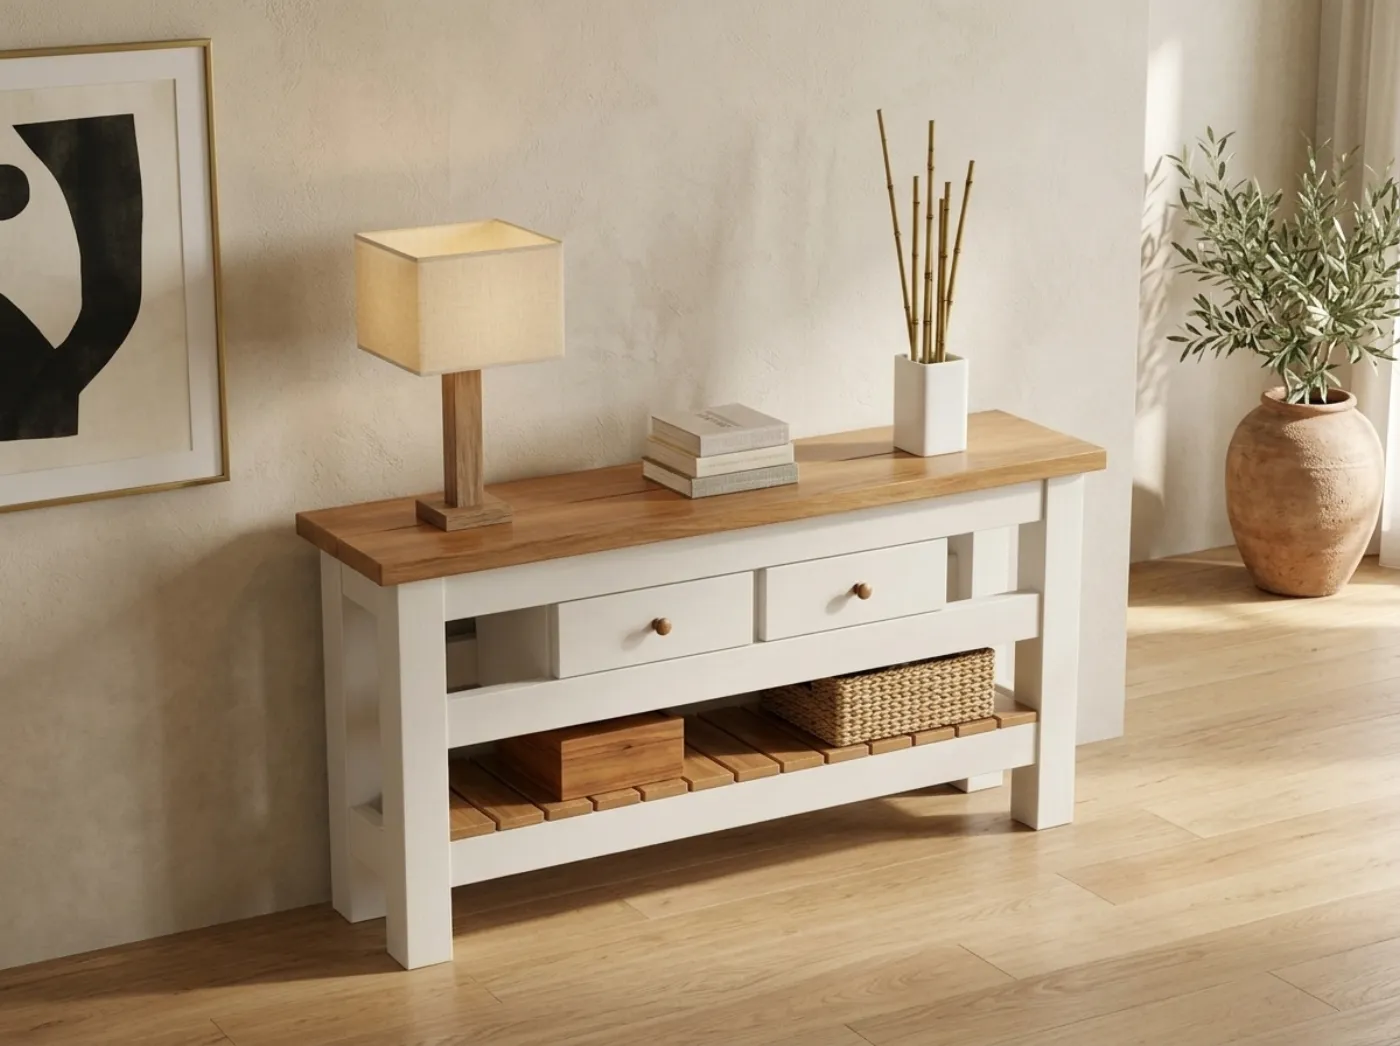
If you are wondering how to make a console table DIY style, you are in luck, because a console is one of the friendliest furniture projects there is. It is small enough to handle alone, it uses a short list of ordinary boards, and the joinery can be done with a drill and a pocket-hole jig. This guide explains how to build a console table from scratch, in order, using the farmhouse console in our console table plans as the worked example.
The method here is general, so you can use it with any plan. The measurements are from our plan: the 48, 60 and 72 in tables are 14-1/2 in deep and 30 in tall, and a narrow hallway version is 60 in long and 9-1/4 in deep. These are generic DIY plans, not engineered drawings.
What a farmhouse console is made of
Before you pick up a saw, it helps to understand the parts. A console table is basically a small bench with a shelf, and the farmhouse style is built from chunky, simple pieces.
- Four square 4x4 legs. These give the table its sturdy, furniture-grade look.
- 2x4 aprons and shelf rails, set on edge. The aprons run between the legs under the top. The shelf rails carry the lower shelf.
- A slatted shelf of 1x4 boards. Slats leave small gaps, which keeps the build light and lets you dust easily.
- 2x2 top cleats. These are the small rails that attach the top to the apron.
- A top of two 2x8 boards laid flat. Two boards side by side make a thick plank top.
For the hallway version, the top is a single 2x10 and the legs are 2x4s, which keeps it slim enough for a narrow entry.
Tools you will need
You can build this with a short list, and most of it is probably already in a garage.
| Tool | What it does here |
|---|---|
| Miter saw or circular saw | Crosscutting legs, aprons and slats to length |
| Drill and driver | Pilot holes and screws |
| Pocket-hole jig | Hidden joints in aprons and rails (plain screws also work) |
| Clamps | Holding joints while glue sets |
| Random-orbit sander | Smoothing the top and the edges |
| Tape measure and square | Marking and checking |
A pocket-hole jig kit is the single most useful purchase for this project, and a pair of quick-grip clamps will serve you on every future build. If you want to learn how the joint works first, read our guide to pocket-hole joinery for furniture. For the full beginner kit, see tools for your first furniture build.
Step by step: how to build a console table from scratch
- Choose the length. Measure the wall where it will stand. The plan offers 48, 60 and 72 in versions at full depth, plus the narrow hallway table. Leave room on each side for lamps or a vase, and do not forget the baseboard.
- Buy straight lumber. Look down each board like a rifle barrel and set aside anything bowed or twisted. For the top, pick two 2x8s with similar grain and as few knots as you can find.
- Cut all the parts first. Work from the cut list and cut every piece before assembly. Mark each piece with its letter. A stop block on the miter saw gives you identical aprons and slats without measuring each one.
- Drill the pocket holes. Drill on the faces that will be hidden: the inside of the aprons and the underside of the shelf rails. Check your jig settings against the board thickness.
- Assemble the two end frames. Each end is two legs joined by an apron and a shelf rail. Glue the joints, then drive the screws. Check each frame for square by measuring the diagonals.
- Join the ends with the long aprons and rails. Stand the two end frames up and connect them with the front and back aprons and shelf rails. Clamp as you go, and recheck for square before the glue grips.
- Add the shelf slats. Space the 1x4 slats evenly, using a scrap spacer to hold the gaps. Fasten them to the shelf rails.
- Attach the top cleats. The 2x2 cleats go along the inside of the aprons, flush with the top edge. They are what you screw the top to.
- Make the top. Join the two 2x8 boards edge to edge with glue and clamps, or leave a small gap for a rustic look. Sand the surface flat and ease the edges.
- Fix the top to the base. Set the top face down on a blanket, place the base on it, and screw up through the cleats. Elongated holes or figure-eight fasteners let the top move with the seasons.
- Sand, finish and add the anti-tip hardware. See the finishing and safety sections below.
Time and effort by stage
The plan does not promise a fixed number of hours, since that depends on your shop and experience. This table shows how the effort tends to spread across the stages, so you can plan a weekend.
| Stage | Effort | Notes |
|---|---|---|
| Shopping and cutting | Moderate | The cut list does the thinking for you |
| Drilling and assembly | Moderate | Clamps and a square matter most |
| Sanding | Moderate to high | The top deserves patience |
| Finishing | Low effort, but slow drying | Plan the coats around drying times |
Optional drawers
The plan includes an optional drawer kit for the three full-depth tables: two drawers on 10 in side-mount slides that you buy. Drawers raise the difficulty, because the slides need to be installed parallel and level. If this is your first build, consider making the plain table first and keeping the drawer kit for a second one. Side-mount drawer slides are sold in pairs, so check the length and the mounting clearance against the drawing before you order.
Finishing a pine console
Softwood can blotch when stained, so a pre-stain wood conditioner helps even out the color. Fill screw holes and any knots with stainable filler, sand through the grits, wipe off the dust, and then apply stain or primer and paint. A water-based polyurethane in satin gives the top protection against rings and spills without yellowing. Allow each coat to dry fully before sanding lightly and applying the next.
If you want a deeper walk-through of color, see how to make pine look like white oak.
Safety
A console table is a gentle project, but there are still sensible precautions.
- Wear eye and hearing protection when cutting and drilling, and a dust mask when sanding.
- Clamp your work. Do not hold small pieces by hand while cutting.
- Anchor it to the wall. Console tables are narrow and can tip, particularly if a child pulls on a drawer or climbs on the shelf. The plan includes an anti-tip check and a safety section. Use an anti-tip strap or wall anchor, and drive it into a stud where you can. See anchoring tall furniture to the wall for the method.
- Ventilate when finishing. Follow the label on every stain, filler and topcoat, and dispose of oily rags as the label directs.
- Check the load. Every member in the plan, including the top, aprons, shelf rails, slats and legs, is checked against a stated load. Do not treat the table as a step stool or a workbench.
What it costs
The plan’s materials estimates, at typical US home-center prices, run from about $130 to $180 for the 48 in table, $140 to $200 for the 60 in, $150 to $220 for the 72 in and $120 to $180 for the hallway version. Those figures cover materials only, not tools you might need to buy. By comparison, finished consoles with thick plank tops and lower shelves run from about $599 to $5,330 in retail listings. For more detail on how the numbers add up, see the build cost page and our console table cost breakdown.
| Version | Dimensions | Materials estimate |
|---|---|---|
| 48 in | 14-1/2 in deep, 30 in tall | about $130 to $180 |
| 60 in | 14-1/2 in deep, 30 in tall | about $140 to $200 |
| 72 in | 14-1/2 in deep, 30 in tall | about $150 to $220 |
| Hallway 60 in | 9-1/4 in deep, one 2x10 top | about $120 to $180 |
Common mistakes to avoid
- Skipping the square check. If the end frames are even a little out, the whole table rocks. Measure the diagonals every time.
- Gluing the top down solid. Wood moves with humidity, and a top glued rigidly to the apron can crack. Fix it with cleats and screws that allow movement.
- Choosing curved boards for the top. A cupped 2x8 will never lie flat. Pick the straightest boards you can.
- Rushing the sanding. Most of what makes a handmade console look expensive is a smooth top and softened edges.
Where the plan fits
Reading a general method is useful, but a plan takes the measuring out of your hands. Our console table plan is a digital download at $9.99 that includes the plan selector, drawings for every size, a cut list, a materials list, a pocket screw and glue schedule, finishing steps, an anti-tip and safety sheet, a build day checklist and a quick-reference card. It is written for beginners and home builders comfortable with a circular saw, a drill and a clamp. You can see all of it on the Farmhouse Console plan page.
Summary
To build a console table from scratch, you choose a length, cut four legs, aprons, rails, slats, cleats and a two-board top, join the end frames with glue and pocket screws, connect them, add the slatted shelf, attach the top with cleats, finish, and anchor the table to the wall. It is a project a beginner can finish in a weekend or two, and the result is a piece of furniture that compares well with far more expensive store versions.